Archive for ‘Cooking’

July 28, 2016

Taiwan Beer Beef Stew

by tina

twbeerbeef01

I’ve always wanted to make a stew with some beer ’cause it seems like you just can’t go wrong with the two together. After experimenting with a couple of recipes, (and my patient husband letting me do my thing and trying out my various stews), I came up with my own version. This is such a good comfort food dish~

Ingredients*:

  • 1 tsp oil
  • 1 onion
  • 1 tsp salt
  • 1 to 1 1/4 lbs beef sukiyaki meat
  • 2 potatoes (medium sized)
  • 1 package (~7 ounces) konjac yam noodles (optional)
  • 2 carrots (2 small or 1 large)
  • 2 tbsps mirin
  • 2 tbsps soy sauce
  • 2 tbsps sugar
  • 3/4 cup water
  • 1 pint Taiwan beer

*Due to different levels of sweetness that may come from the onion or carrots, you may need to adjust certain seasonings to taste. (For example, you may want to start off with a little less sugar and add more later, or you may need to add a little more salt, mirin, or soy sauce later.)

Here is a picture of the ingredients that I used:

twbeerbeef02

Directions:

Heat the pot at medium high. Add the oil. When the oil is warm, add the onions. Stir and cook for about 1 min. Add the salt and stir.

Add the beef in and stir for about 1-2 mins, or until you start to see some browning.

twbeerbeef03twbeerbeef04

Then add in the potatoes, konjac yam noodles, and carrots.  Stir for about 1 min.

Add in the mirin, soy sauce, sugar, and water. Turn the temperature to high.

twbeerbeef05twbeerbeef06

Then pop open that bottle of Taiwan beer and pour it in!

twbeerbeef07

Once the stew reaches to a boil, turn the temperature down to low to simmer for 1 hour.

Before:

twbeerbeef08

After:

twbeerbeef09

Scoop some into a bowl and have some rice on the side. And don’t forget the beer.

Food is ready :) Delicious and super easy.

twbeerbeef10

Tags: , , ,
March 25, 2016

Steamed Egg for Two

by tina

steamedeggfortwo01

I’ve always wanted to make this, especially since my husband absolutely loves eggs. The silky smooth texture is really a treat. The best steamed eggs we’ve had were in Taiwan and Japan. Although this is not as professional and more of an impromptu recipe, it sure satisfies our cravings!  Also, using cute mugs for this makes it fun =)

Ingredients:

  • 2 shiitake mushrooms
  • 2 slices of carrot
  • 1 leaf of a vegetable (your choice)
  • 6 ginkgo nuts
  • 2 tablespoons (approx.) shredded chicken
  • salt
  • 1 cup chicken broth (homemade or store bought)
  • 2 eggs
  • 1/5 cup water (for steaming)

Total preparation and cook time: 2 hrs, if making with homemade chicken broth
or: 45 mins, if making with store bought chicken broth

This is optional, but I like to make the steamed egg with homemade chicken broth. You may think it’s rather time consuming, but if you’re also making chicken soup for dinner… then better yet, you’re killing two birds with one stone–You’ll have both steamed egg and some chicken soup of your liking done within the 2 hrs!

First thing’s first, soak the shiitake mushrooms in some water.

Then, simply boil the chicken with some water for about 30 mins. Make sure you don’t add too much water in the beginning since you don’t want to dilute too much of the chicken flavor. After 30 mins of boiling, taste the broth. If you think it’s too concentrated, add some water to dilute it. Then scoop out a little more than 1 cup of broth and a piece of chicken (dark or white meat) into a bowl.

Add salt to taste. (*note that the salted broth will be diluted with the egg later, so it can be a bit saltier than you’re used to). Let the broth cool, while you continue to make the chicken soup of your liking.

steamedeggfortwo02

Prepare the ingredients that will go into the mugs. Crack, shell, and remove/peel the skin off the ginkgo nuts. Cut the carrots into flowers. Cut the leaf of the vegetable into small pieces. Shred the chicken into small pieces. Wash and cut the stems off the shiitake mushrooms, then create slits at the top.

steamedeggfortwo03

In a large bowl, scramble the 2 eggs, making sure there are no large clumps. Strain the chicken broth (only if it’s homemade) and add to eggs. Mix.

steamedeggfortwo04

Place the shredded chicken in the mugs.

steamedeggfortwo05

Add the chicken broth egg mixture.

steamedeggfortwo06

Place 3 ginkgo nuts in each mug. Then add the vegetable, shiitake mushroom, and carrot on top.

steamedeggfortwo07

Place the mugs in your Tatung cooker. Add 1/5 cup of water in the outer pot, cover, and switch on the cook switch.

steamedeggfortwo08

Once the switch switches up, make sure to wait about 15 mins before you open the lid to enjoy your mug of steamed egg.

steamedeggfortwo09

March 9, 2016

Taiwanese Style Steamed Pork Ribs

by tina

twporkribs01

I had been making the same pork dishes, so it was overdue to try something new. I love these pork ribs–They become fall off the bone tender when steamed! Not to mentioned that they’re pretty low maintenance to make, despite the longer preparation and cook time. But what’s nice is that you could focus on cooking other dishes for your meal while this is in the cooker.

Ingredients:

  • 1 1/2 lbs pork ribs (approx.)

Marinade:

  • 2 tablespoons + 1 teaspoon of sugar
  • 2 tablespoons rice wine
  • 1/4 cup black vinegar
  • 1/2 cup soy sauce
  • 1/2 cup + 2 tablespoons water

Aromatics for steaming:

  • 1 by 1 inch ginger
  • 2 large garlic cloves
  • 3 Thai chilies for mild spice

4 servings

Total preparation and cook time: approx. 2 hours

I used a Tatung rice cooker (6 cups) to steam these ribs. **When first purchased, these rice cookers come with an inner pot, but the cooker that I have is 20+ yrs old passed down from my mother, and the inner pot that came with it has been lost. Instead of finding a bowl to fit into the rice cooker, you should use the inner pot instead to steam the ribs in.

twporkribs02

Directions:

Boil the ribs for about 2 mins, or until you see some bone marrow start to float up to the surface.

twporkribs03

Remove from heat, rinse the pork ribs with cold water, and set them aside to cool. In the meantime, prepare the marinade. In a large bowl, mix the sugar, rice wine, black vinegar, soy sauce, and water. The sugar takes a while to dissolve to make sure to mix thoroughly.

Place the ribs in a large ziplock bag, and pour the well mixed marinade into the bag. All the ribs should be soaking in the marinade. Let it marinate for 1 hour. (if for some reason they are not all soaked in the marinade, check back in 30 mins to adjust the ribs so that the other side will be soaked)

twporkribs04

When the ribs have been soaking for 50 mins, prepare the aromatics. Peel and slice the ginger into semi-thin pieces. Peel and chop the garlic into halves. Remove the seeds from the Thai chilies.

Temperature at medium high, add very little oil, and sauté the ginger, garlic, and Thai chilies. Sauté until garlic and ginger lightly browned.

twporkribs05

Place the ribs and marinade in a large bowl (large but small enough to fit into the rice cooker). Then add the aromatics into the bowl.

twporkribs06

Place the bowl into the rice cooker and add 1.5 cups of water on the outside of the bowl. When it is done steaming and the switch switches up (approx. 30 mins), open the lid and flip the ribs. Add another 1.5 cups of water on the outside of the bowl. Once the switch switches back up again (approx. 30 mins), your delicious ribs are done!

twporkribs07

Tags:
November 20, 2015

Braised Pork Belly Rice Bowl aka Lu Rou Fan (滷肉飯)

by tina

luroufan01

I’ve been a bit obsessed with pork belly lately. I’ve had some good braised pork belly rice bowls in Japan and Taiwan, that I wanted to somehow recreate it in my own kitchen. And since my last recipe was braised pork belly with mustard greens, I figured why not try and make the rice bowl style–Shouldn’t be too hard, right? Yes, in fact, I found this much easier to make. This recipe doesn’t require to fry the skin of the pork belly, hence no oil splattering encounters! (no getting hurt)

I tend to like my food on the lighter side, so this recipe is just that. Feel free to add more soy sauce in the sauce for simmering if you like this dish a little saltier.

Ingredients:

  • About 2 lbs pork belly (with skin on)
  • 1 dozen hard boiled eggs peeled

Water bath

  • 2 stalks green onions
  • 3 to 5 cloves garlic (depending on size)
  • 1 by 3 inch ginger
  • 2 star anise

Sauce for simmering

  • 3/4 cup + 2 tbsp soy sauce
  • 1/2 cup dark soy sauce
  • 2 tbsp + 3 tsp sugar
  • 7 cups water
  • 2 tbsp rice wine
  • 3/4 tsp five spice powder
  • 2 star anise (same from water bath)

Toppings

  • egg (half)
  • 1 small stalk of preserved mustard green
  • 1 small clove garlic
  • 1 Thai chili
  • cilantro

**Allow about 3 hrs to make

Directions:

luroufan02

Some pork meats tend to have more of a porky smell or taste, so boiling it in the water bath will take some of that away and will also boil out some of the fat that will make the dish less oily.

Start by filling the pot with water. Peel the garlic cloves. Peel and cut the ginger into small chunks. Cut the green onions. Place these ingredients and star anise in the water. Turn the temperature to high.

luroufan03

When it comes to a boil, place the pork belly, skin down, in the water bath. Make sure the pork belly is covered completely by water. Cover lid. Turn temperature to low medium and simmer for 30 mins. In the meantime, boil the eggs for about 20 mins. (You do not need to boil a dozen. You can boil any amount you want. I just like to boil more so that I have breakfast the next couple of days :))

luroufan04

Take the pork out and let it cool for about 10 mins, and tweeze away any hairs on the skin. Put it in the refrigerator for 1 hour. (This will allow the meat to harder so that it’ll be easier to cut into small chunks.) If you haven’t done it already, make sure to cool the eggs as well before peeling them.

luroufan05

Take the pork out of the refrigerator and cut it into small chunks, about 1/2 inch wide, square pieces.

luroufan06

For the sauce, simply mix the soy sauces, sugar, water, rice wine, and five spice powder in the pot. Place the star anises in. Turn the temperature to high until boil. Place the pork belly chunks and eggs in. When it comes to a boil once again, turn the temperature down to low to simmer. Simmer for about 1 to 1.5 hours.

luroufan07

For the toppings portion, wash and soak the preserved mustard green for about 15 mins, or until it is not as salty as when you took it out of the package.

luroufan08

Cut it into very small pieces. Also, minced the garlic and remove the thai chili seeds.

Use a pan and turn the temperature to medium-high. Place a little bit of oil in. Once the oil is warm, place the minced garlic and Thai chili in. Let it sizzle a little to let the aromas hit its peak. Then add the preserved mustard green in. Stir for about 30 secs. Place this in a bowl and set aside. (you can throw away the Thai chili at this point).

luroufan09

Once the pork belly is done simmering, you are ready to put together your rice bowl. Place some pork belly with some sauce on top of your white rice. Then half of an egg, preserved mustard greens, and some cilantro on top to complete the bowl!

luroufan10

Tags: ,
October 15, 2015

Braised Pork Belly with Preserved Mustard Greens (梅菜扣肉)

by tina

porkbelly_meitsai01

I had first made this dish back in April this year and finally had the time to perfect it. The main thing I was working on was getting the right sauce quantity needed for steaming and also the right amount of soy sauce and sugar for the right taste.

This dish brings back a lot of childhood memories, as it was one of my favorites as a child. My grandma in Taiwan used to preserved the mustard greens herself and we would either get some from her every time we visit Taiwan or she would bring some to us in the states. My mother made it the best. Although I don’t think I’ve been able to replicate that exact same taste, but I think it is pretty darn close.

Ingredients:

  • About 2 lbs pork belly (with skin on)
  • 2 cups preserved mustard greens (梅菜)

Water bath

  • 5 cloves garlic
  • 1 by 3 inch ginger
  • 2 stalks green onions
  • 1 star anise

Vegetable portion

  • 1/4 tsp sugar
  • 1 tbsp soy sauce

Sauce for steaming

  • 1/4 cup soy sauce
  • 1 tbsp sugar
  • 1 cup water
  • 1 star anise (can be the same one from the water bath)

**Allow about 5 hrs to make

Directions:

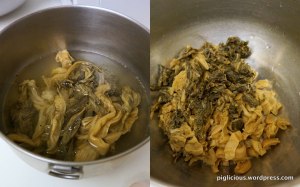
First, soak the preserved mustard greens in water for at least 2 hours. Then naturally, wash and cut into pieces.

The 梅菜 I have here are from Taiwan, preserved by my relatives. If you buy the completely dried packages from an asian grocery store, they will need to be soaked for a much longer time–at least 5 hours, and they’re usually already cut into pieces.

porkbelly_meitsai02

Now onto the pork belly.

porkbelly_meitsai03

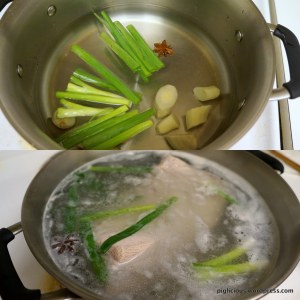
You will need to boil out the fat and give the meat some flavor in a water bath.

Fill the pot with water. Peel the garlic cloves. Peel and cut the ginger into small chunks. Cut the green onions. Place these ingredients and star anise in the water. Turn the temperature to high. When it comes to a boil, place the pork belly in the water bath. Make sure the pork belly is covered completely by water. Cover lid. Turn temperature to low medium and simmer. Flip the pork belly around after 30 mins and continue simmering for another 30 mins. So the total simmer time is 1 hour.

porkbelly_meitsai04

Take the pork belly out of the water bath and place it on the cutting board. Since it is still too hot to touch, you can check the skin for any pork hairs and remove with tweezers. Wait until it is cooler to touch, then make small slits on the skin with the tip of a knife. Coat all surface area with soy sauce. Let is sit for about 10 mins.

porkbelly_meitsai05

The next step is to sear the pork belly skin: Heat the pan on medium high and when the pan is hotter, add about 2 tablespoons of canola oil.  When the oil is hotter, place the skin side of the pork belly down in the pan. Be careful, the oil may splatter, so use the pan lid as a shield or an oil splatter screen.

Sear the skin until brown. Try to sear as evenly as you can by tilting the pan and moving the oil around in the pan so that the sides and edges can be seared.

porkbelly_meitsai06

Using the same oil that was used to fry the pork belly skin. Turn the temperature to high until the pan and oil is hotter and place the preserved mustard greens in the pan. Stir for about 30 secs. Add the sugar and soy sauce and continue stirring for about 1-2 minutes. Then set it aside.

porkbelly_meitsai07

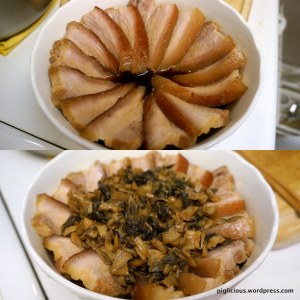
Slice the pork belly into thin slices (~1/2 inch slices) and place them in a large enough bowl that will be able to fit into your rice cooker/steamer. To fit all the slices evenly in the bowl, you can first put a few slices at the bottom of the bowl and then fan out the rest of the slices on top.

For the sauce, simply mix the soy sauce, sugar, and water. Pour in the sauce along with the star anise. Add the preserved mustard greens on top.

porkbelly_meitsai08

Put 3 cups of water in the rice cooker. Place the bowl in the rice cooker (Tatung rice cookers are such good steamers). Cover bowl with a plate. Cover with rice cooker lid. Switch down that cook button.

Once the button clicks back up, you must wait for about 1 hour before it is ready.

porkbelly_meitsai09

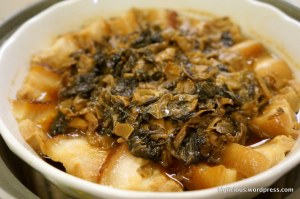
It is now ready. (finally)

porkbelly_meitsai10

Tags: ,