Archive for ‘Steamed’

March 25, 2016

Steamed Egg for Two

by tina

steamedeggfortwo01

I’ve always wanted to make this, especially since my husband absolutely loves eggs. The silky smooth texture is really a treat. The best steamed eggs we’ve had were in Taiwan and Japan. Although this is not as professional and more of an impromptu recipe, it sure satisfies our cravings!  Also, using cute mugs for this makes it fun =)

Ingredients:

  • 2 shiitake mushrooms
  • 2 slices of carrot
  • 1 leaf of a vegetable (your choice)
  • 6 ginkgo nuts
  • 2 tablespoons (approx.) shredded chicken
  • salt
  • 1 cup chicken broth (homemade or store bought)
  • 2 eggs
  • 1/5 cup water (for steaming)

Total preparation and cook time: 2 hrs, if making with homemade chicken broth
or: 45 mins, if making with store bought chicken broth

This is optional, but I like to make the steamed egg with homemade chicken broth. You may think it’s rather time consuming, but if you’re also making chicken soup for dinner… then better yet, you’re killing two birds with one stone–You’ll have both steamed egg and some chicken soup of your liking done within the 2 hrs!

First thing’s first, soak the shiitake mushrooms in some water.

Then, simply boil the chicken with some water for about 30 mins. Make sure you don’t add too much water in the beginning since you don’t want to dilute too much of the chicken flavor. After 30 mins of boiling, taste the broth. If you think it’s too concentrated, add some water to dilute it. Then scoop out a little more than 1 cup of broth and a piece of chicken (dark or white meat) into a bowl.

Add salt to taste. (*note that the salted broth will be diluted with the egg later, so it can be a bit saltier than you’re used to). Let the broth cool, while you continue to make the chicken soup of your liking.

steamedeggfortwo02

Prepare the ingredients that will go into the mugs. Crack, shell, and remove/peel the skin off the ginkgo nuts. Cut the carrots into flowers. Cut the leaf of the vegetable into small pieces. Shred the chicken into small pieces. Wash and cut the stems off the shiitake mushrooms, then create slits at the top.

steamedeggfortwo03

In a large bowl, scramble the 2 eggs, making sure there are no large clumps. Strain the chicken broth (only if it’s homemade) and add to eggs. Mix.

steamedeggfortwo04

Place the shredded chicken in the mugs.

steamedeggfortwo05

Add the chicken broth egg mixture.

steamedeggfortwo06

Place 3 ginkgo nuts in each mug. Then add the vegetable, shiitake mushroom, and carrot on top.

steamedeggfortwo07

Place the mugs in your Tatung cooker. Add 1/5 cup of water in the outer pot, cover, and switch on the cook switch.

steamedeggfortwo08

Once the switch switches up, make sure to wait about 15 mins before you open the lid to enjoy your mug of steamed egg.

steamedeggfortwo09

March 9, 2016

Taiwanese Style Steamed Pork Ribs

by tina

twporkribs01

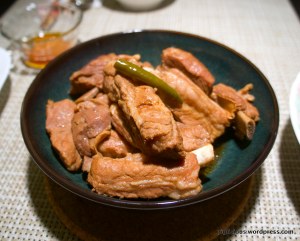
I had been making the same pork dishes, so it was overdue to try something new. I love these pork ribs–They become fall off the bone tender when steamed! Not to mentioned that they’re pretty low maintenance to make, despite the longer preparation and cook time. But what’s nice is that you could focus on cooking other dishes for your meal while this is in the cooker.

Ingredients:

  • 1 1/2 lbs pork ribs (approx.)

Marinade:

  • 2 tablespoons + 1 teaspoon of sugar
  • 2 tablespoons rice wine
  • 1/4 cup black vinegar
  • 1/2 cup soy sauce
  • 1/2 cup + 2 tablespoons water

Aromatics for steaming:

  • 1 by 1 inch ginger
  • 2 large garlic cloves
  • 3 Thai chilies for mild spice

4 servings

Total preparation and cook time: approx. 2 hours

I used a Tatung rice cooker (6 cups) to steam these ribs. **When first purchased, these rice cookers come with an inner pot, but the cooker that I have is 20+ yrs old passed down from my mother, and the inner pot that came with it has been lost. Instead of finding a bowl to fit into the rice cooker, you should use the inner pot instead to steam the ribs in.

twporkribs02

Directions:

Boil the ribs for about 2 mins, or until you see some bone marrow start to float up to the surface.

twporkribs03

Remove from heat, rinse the pork ribs with cold water, and set them aside to cool. In the meantime, prepare the marinade. In a large bowl, mix the sugar, rice wine, black vinegar, soy sauce, and water. The sugar takes a while to dissolve to make sure to mix thoroughly.

Place the ribs in a large ziplock bag, and pour the well mixed marinade into the bag. All the ribs should be soaking in the marinade. Let it marinate for 1 hour. (if for some reason they are not all soaked in the marinade, check back in 30 mins to adjust the ribs so that the other side will be soaked)

twporkribs04

When the ribs have been soaking for 50 mins, prepare the aromatics. Peel and slice the ginger into semi-thin pieces. Peel and chop the garlic into halves. Remove the seeds from the Thai chilies.

Temperature at medium high, add very little oil, and sauté the ginger, garlic, and Thai chilies. Sauté until garlic and ginger lightly browned.

twporkribs05

Place the ribs and marinade in a large bowl (large but small enough to fit into the rice cooker). Then add the aromatics into the bowl.

twporkribs06

Place the bowl into the rice cooker and add 1.5 cups of water on the outside of the bowl. When it is done steaming and the switch switches up (approx. 30 mins), open the lid and flip the ribs. Add another 1.5 cups of water on the outside of the bowl. Once the switch switches back up again (approx. 30 mins), your delicious ribs are done!

twporkribs07

Tags:
December 27, 2011

Asari Sakamushi (Sake Steamed Clams)

by tina

I’ve had this before at a Japanese tapas restaurant and it tasted simply delicious. I randomly decided to try to make this when I saw that the live clams were on sale at my nearby grocery store. Can’t go wrong with live clams–They turned out yummy.

Ingredients:

  • 15 – 18 clams (about 0.8 lb. I used live Manila clams)
  • ~15 slices of ginger (cut in strips)
  • ~15 pieces of lemon zest (cut in strips)
  • 2 – 3 pieces wakame Or 1 large piece of kombu
  • 2 1/2 cups water
  • 1/4 cup sake
  • 1/8 – 1/4 teaspoon salt
  • 1 green onion (cut in thin vertical/longitudinal strips aka julienned)

Soak the clams in water with a little salt for ~4 hrs or overnight. We want the clams to spit out the “dirty” water and/or sand in their system.

After they have been soaked, scrub the clam shells down (I used a toothbrush).

Picture of the ingredients (and the kind of sake) I used:

Place the water in a (smaller) pot and turn the temperature to high and bring it to a boil. (You could start with a little less water in case it’s too diluted for your taste). With the water boiling, place the ginger, lemon zest, and kombu/wakame in. Let them boil for 30 secs. Then add in the clam. Add the sake. Add the salt (start with 1/8 teaspoon). Let it come to a boil, for about 3-5 mins or until the clam shells open. If the soup is not salty enough for you, then add a little more salt at this point. Boil for another minute.

Turn the temperature down.

Transfer into a large bowl and garnish with green onions on top.

August 9, 2011

Steamed Green Beans

by tina

This is not your average boring/bland steamed green beans!  The garlic, soy sauce, and olive oil combination for the sauce makes the green beans extra tasty. Must I also add that it’s quick and easy to make.

Ingredients:

  • 3-4 handfuls green beans
  • 2 garlic cloves
  • 1.5 teaspoon soy sauce
  • 2 teaspoon extra virgin olive oil

1) Clean up the green beans. Snip both ends of each green bean by simply snapping/breaking it off with your hands. And in the process, break the long green bean into 2 or 3 smaller pieces.

2) Boil them until they become brighter green, or, boil them for ~5 minutes. (If you’re not sure, you can eat one to see if it’s cooked)  Drain the hot water immediately. Run cold (filtered) water through, and then drain completely. Let it cool down some more while you prepare the sauce.

3) Chop up the garlic cloves into small pieces (not quite minced). Then add the soy sauce and extra virgin olive oil.

4) Add the green beans and mix thoroughly.  For even better taste, wait about 10 minutes before eating for the sauce to seep into the beans.

voilà! :) (caution: beware of garlic breath)

Tags: